Common Prong Setting - How to create a perfect common prong?
Common Prong Setting, as its name suggests, has the prong placed at the top and holding two diamonds by their girdle on its either side.
It's a very widely used setting for round brilliant diamonds, as it creates sparkling trail of stones with little or no space between the stones.
For your better understanding, I have explained below the procedure to create a perfect common prong setting of five round brilliant diamonds in a ring. It involves:
- Layout
- Bearing Creation
- Seating and Setting of diamonds
Layout
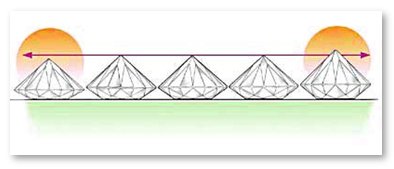
- First place the diamonds to be mounted in the layout position (table down) over a flat surface, and arrange the diamonds in order of total depth, placing shallowest pieces at the ends.
Common Prong Setting Layout
- Measure the diameters from different sides to confirm that diamonds are round.
- Check mounting of ring where diamonds are to be studded. Ensure that prongs are straight, evenly spaced and symmetrical.
- Verify that the size of ring is correct, as it will be difficult to re-size it later.
Bearing Creation
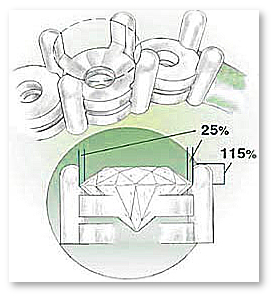
- Select a setting bur that is equal to or slightly smaller than the overall diameter of diamonds. Proceed by creating the bearing (hole) for largest diamond at the center position of ring mounting.
Common Prong Bearing Creation
- During bearing process, all four prongs should be equally cut and ensure that prong is not cut more than 25% of its total thickness. Check that when you place the diamond in the respective bearing, the height of prong is slightly more than top of the diamond.
Equally Cut Prong
- Repeat the same process for other diamonds. You can adjust the bur according to the diameter of diamonds. If a diamond has low crown height then position its bearing little higher than others, so that all diamonds are in same level when set.
- Trim away the excess metal left after burring and bearing.
- With the help of brass pusher, position each diamond into its respective bearing.
- Verify all diamonds are at the same level, even height and arranged symmetrically with even spacing.
- Now, shape the prongs using a file ensuring even and consistent form.
Seating and Setting the Diamonds
- Start placing the diamonds in their respective bearing in their setting position (table top).
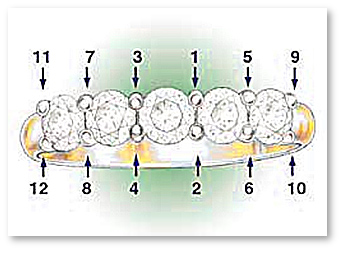
- With the help of chain nose pliers, bend the prongs half-way to secure the diamonds in their bearing and restrict the movement of diamonds. Biggest diamond should be set first. Below image displays the sequence of setting according to the stone size.
Sequence of Setting of Common Prongs
- Verify top of the tables of each diamond are at same level and even.
- Slowly and carefully bend each prong over the diamond. You have to keep in mind that one prong secures two diamond so bend the prongs slowly in several steps and not in single shot.
- Check with a 10X loupe or under microscope that prongs have even hold over diamonds, and all prongs are at equal height. At this point, there shouldn't be any movement in the set diamonds.
Flaws of Common Prong Setting
Flaws of common prongs (left to right) - Thin Prongs, Improper Prong Height, Improper Prong Spacing
Buyer’s Checklist of Common Prong Setting
- The row of diamonds is evenly spaced and table of diamonds are even. The overall height of set diamonds is same.
- The orientation of each diamond’s table is uniform.
- The prongs are evenly spaced and should be of same style.
- The prongs have even hold over diamonds and all prongs are at even height.
- Not more than 50% of the overall prong thickness was removed.
- Any excess metal left by burring and bearing is removed.
- Diamonds are evenly-spaced with no overlapping of diamonds. Any overlapping can damage the diamonds in long run and spoil the beauty of design.
- Diamonds are not damaged while setting, tool marks have been removed and metal surface is uniform, smooth and scratch free.
Return from Common Prong Setting to Prong Setting page
Return from Common Prong Setting to Diamond Jewelry Homepage
I hope you'll not mind sharing this on Twitter, Facebook and with everyone else :)
Feel free to share if something is in your mind and want it to be covered on this site.
My Newsletter
Did you liked this article? Sign-up my FREE weekly newsletter and I'll send you more awesome new additions on this website along with latest jewelry happenings around the world, and download my Jewelry Design Album for FREE!
 |
|
